Pebbledash removal in Wakefield
Pebbledash removal in Wakefield
Pebbledash is a render with small stones bedded into its surface. It is tough and hides patchy brickwork, but it is hard to repaint well, it cracks and blows with age, and many owners simply want a smoother modern finish. Removing it is a messy, physical job, and it is only half of the work: whatever is underneath then has to be repaired and re-rendered.

On this page
What pebbledash is and why it fails
A dry-dash finish is built in two stages. A cement-based coat, often called the butter coat or dash receiver, is trowelled on, and while it is still soft, washed aggregate is thrown at it and tamped in. Structherm's data sheet for its dash receiver describes exactly that: a 6–8mm coat, aggregate thrown on while the render is still plastic, then lightly tamped with a wood float. Structherm's standard dash receiver is normally applied onto a base coat, so a dashed wall is often two or three layers deep.
Over time the layers part company. Water gets in through cracks and around sills, freezes and pushes the dash away from the backing coat, or the whole build-up away from the brick. Tap a pebbledashed wall and you often hear hollow patches. Loose stones falling onto paths, bulges, cracks that follow the lines of the brickwork, and old patches of a different colour are the usual signs that a dashed wall has reached the end of its life.
- Trial area A small patch is taken off to see how well the dash is bonded and what lies beneath.
- Removal Dash and backing render are hacked off to masonry or to a sound backing coat.
- Clear and dispose Debris is bagged or skipped; this is heavy, dusty and noisy work.
- Repair the masonry Exposed bricks, blocks and joints are repaired before anything new goes on.
- New render system The wall is rendered with the chosen system, or left as fair-faced masonry if suitable.
The usual order of work. The survey and the chosen products decide the actual steps.
Strip it, overcoat it or paint it?
If the dash is sound and you only dislike the colour, it does not have to come off. Some masonry coatings are made for dashed surfaces; Structherm lists pebble-dashing among the substrates for its silicone masonry paint, as long as the wall is sound, dry and clean and repairs are made first. If you want a smoother or fresher textured look on a dash that is still firmly bonded, an overcoat is another route: Structherm makes an overcoating dash designed for refurbishment over existing dry-dash finishes.
Removal makes sense when large areas are hollow, when the dash is cracked and letting water in, or when you want a thin-coat silicone or a smooth finish that cannot sit on an uneven, failing base. Removal also lets you see and repair the wall. If a test patch shows the dash and the backing coat are welded to the brick, taking it off may damage the brick faces so badly that a full new base coat is needed anyway.
How the dash comes off and the wall goes back
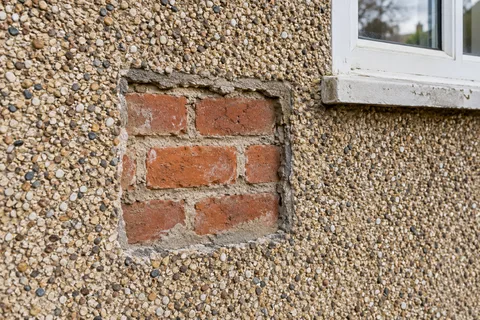
Hollow areas often drop off with little effort. Well-bonded dash takes longer and is noisier, and it can pull the face off soft bricks. Expect a lot of rubble, dust on everything nearby and a wall that looks worse before it looks better. What you find underneath varies: common brick that was never meant to be seen, patches of different brick around old windows and doors, blockwork extensions, timber lintels and old cracks. That is why exposed brick is rarely a realistic end result after pebbledash, and the wall is normally re-rendered.
The new render has to cope with all of that. Loose joints are raked out and repointed, damaged units replaced, and hollows dubbed out. A base coat with alkali-resistant mesh bridges small differences in the backing, with extra mesh at window and door corners where cracks start. Then the new finish goes on: a silicone or acrylic thin coat, a scraped through-coloured render, a painted sand-and-cement render or a new dash.
Tap-test and chalk out the hollow areas, then cut a small trial patch.
Sheet windows, doors and paths and set up debris collection.
Hack off the dash and backing coat with a bolster or light breaker.
Clean down, rake out loose joints and repair damaged brick or block.
Dub out deep hollows so the new base coat goes on at an even thickness.
Fix new beads and apply a meshed base coat.
Apply the chosen finish and protect it while it cures.
Rules worth checking first
Under Approved Document L, stripping to masonry and replacing the render of a wall is renovation of a thermal element, and once more than half of that wall, or more than a quarter of the whole envelope, is involved, the guidance expects the wall to be upgraded where that is technically, functionally and economically feasible. Ask building control before work starts, because it may make sense to add insulation while the wall is bare. In a conservation area, new render or pebble dash is not permitted development, so check with the council before changing the finish of a house in one of the Wakefield district's 31 conservation areas.
Common questions
Will the brickwork underneath look good enough to leave bare?
Rarely. Brick behind pebbledash was usually laid to be covered, and removal tends to damage its faces. A trial patch shows what is there, but most stripped walls are re-rendered.
Can a new render go over the pebbledash without removing it?
Only if the dash is soundly bonded. A tap test and a trial show whether it is; hollow or cracked dash has to come off first.
See housing and planning information for Wakefield and nearby places, including the source and geography behind each figure.